When are the best times for paint projects to be done?
There are several answers to this so let’s break it down. We will talk: interior, exterior, cabinets, and when to get a deal/find a sale. Let’s start with the inside work.
Interior painting: There is really no bad time to schedule interior painting. It’s not very affected by the weather, though on a rainy day the moisture can affect paint drying. A good percentage of interior work comes when people are moving and the best possible scenario is to paint before moving in. We know closing dates and inspections can change and are unpredictable. We schedule these by asking the earliest possible date that someone would like and then put it on the calendar. If the project needs to be moved back, that is easier than to schedule further out and then try and move up. If we have to push a project back there are always people willing to move up. If other projects are going on then it’s usually best to put painting at the end of the entire project. Think of us as the cherry on top of the sundae. We will protect floors, cabinets, countertops, etc. It’s going to be better to finish off all your other work with a fresh paint job.
Cabinet painting: Just like walls, trim, and ceilings, we can paint your cabinets year round. They aren’t affected by weather. We also do them routinely with the house being occupied. We plastic off the kitchen with a vent/fan to keep the rest of your house clean. If you are painting the walls/ceiling then let us go first on this one. It will not only save a little time for us prepping those areas, but will minimize the possibility of overspray getting on a freshly painted area. The busiest time for cabinets usually comes in the months before the holidays. Starting around mid-September people will start to get prepared for the holidays. Cabinets are a centerpiece of a kitchen and it can totally change your space for the holidays. If you think that’s going to be your plan then get scheduled earlier in the fall to make sure we don’t get bogged down.
Exterior work: This is definitely the trickiest type of project to schedule. We get the most calls for exterior work in the mid to late fall. Every year it never fails that a lot of people call with only a couple of weeks left with decent weather. The absolute best time to schedule exterior work is summer into fall. It doesn’t get warm enough to do much until mid-April and then it’s usually raining. The paint we use can be applied down to thirty five degrees, but with the increase in dry time (due to temperature), it’s not an ideal situation. Oil based deck stain can be applied with no temperature limitations, so that’s going to be whatever the painter can handle.
Sales or deals: Holidays and back to school times are good times to look for a special. We slow down some during these times and painting can make for a great Christmas present! We have also done specials for “first exterior booking of the year” or also to get work on the calendar in advance. Our busiest times are February - June and September - early December. If you know you want a project done but want to save some money, those are the best times to look.

Decks and fences: What you need to know.
Our favorites are Ready Seal for transparent and Flood for the solid stain. Ready Seal is an oil based stain that penetrates into the wood. It lets the wood grain show through while adding color to your deck or fence and repelling water.
Whether your deck or fence is brand new or getting kind of old, it’s going to need some protection from the elements. By elements, I mean: sun, wind, rain, snow, sleet, ice…all that stuff. In just a few months after being up you may notice it start to “grey.” This is a normal process that doesn’t mean the wood is going bad. It’s that the ultraviolet rays from the sun are starting to break down the wood. When wood starts to rot is when you have a problem. Here’s some things you need to know, recommendations, and product information to take care of your deck/fence and prolong that process.
There are many different products on the market for wood. I’ll go in order from most transparent to least. They are a clear coat, transparent stain, semi-transparent, semi-solid, solid. Our company only uses a transparent and a solid stain. The other ones have their place, but we just don’t offer them. Our favorites are Ready Seal for transparent and Flood for the solid stain. Ready Seal is an oil based stain that penetrates into the wood. It lets the wood grain show through while adding color to your deck or fence and repelling water. The most popular color we’ve found so far is pecan. It’s a mild brown with some deep notes that pairs with almost any house and landscape. Oil based stains are very thin and runny. If your substrate already has stain on it, this may not be the best option. With stain we want uniformity, so if there’s another substance on there it will need to come all the way off. If it doesn’t come off, it will show through the new stain to some extent. For application, we recommend using gloves and to roll/brush slowly so you don’t fling stain everywhere. Solid stains will be more like paint and likely be soap and water to clean up. These will be thicker and won’t run as much. Roll them on evenly for a nice new finish that will look painted. Semi-transparent and semi-solid are stains will fall in the middle of these two. Semi-transparent will have a little more “body” than transparent and semi-solid will have a little less than solid. Also, the thicker the product, the longer the life-span. Personally, I would rather do more maintenance and keep the transparent look.
You can apply stain in the same way you can apply paint. It can sprayed, brushed, or rolled. The problem you can run into with any of these is the wind. A windy day will make overspray fly over the entire neighborhood. That’s to be expected. It will also take drips and splatters from a roller or brush and send them all over a house, doors, cars, or anything else in the way. RollTheLex will usually brush and roll decks. Ready Seal is great for this. It’s marketed as a “goof proof” product and that’s true. It’s almost impossible to mess up. You can roll, spray, or brush and it all looks the same. The stain soaks in nicely and doesn’t leave brush or lap marks. Solid stain will be the same with rolling/brushing. It’s a little more difficult to lay out because it’s thicker, but it can be applied in these ways just fine. Spraying is done selectively and with care. It doesn’t take much wind for overspray to go flying so in most instances we stay away from this.
Finally, let’s talk about preparation. The wood needs to be as clean as possible and able to accept stain. The first thing to do is drop some water on the wood and see if it soaks in. If the water soaks in, it’s good to go, though we still give it a light wash. If it doesn’t soak in the wood needs to be opened up. We do this by using a cleaning agent and bristled brush. We start soft and work to more of a stiff bristle if needed. We don’t want to damage the wood if possible. Sometimes it takes a little more elbow grease to get the wood ready. The best way to avoid this is regular maintenance/cleaning of the wood. Once it is washed and dries out, you are good to stain! Oil based stain needs to have a moisture reading usually under 12%. Solid stain can have more because it’s water based.
Now that you have the lowdown on stain, pick the right one for your project and get to work. If it seems like a daunting task, you can always hire it out. Happy staining!
Other services we offer
Yes, our name is RollTheLex Painting and our main service is, you guessed it, painting. By now you probably know we paint just about anything. Interior, exterior, fences, decks, and we specialize in cabinets. We also do some extra things you may not know about so let me fill you in.
Trim Carpentry: We can install baseboards, crown molding and quarter round. Trim carpentry serves several purposes. Crown moulding can add an elegant accent to a room such as dining or master bedroom. Putting up larger base can make a room look bigger and adding quarter round makes your walls look larger. We can also change out door/window casings for a different look in those areas or hang new doors if you need them. Once all the new pieces are installed we can caulk, sand, and paint.
Backsplash: Installing backsplash goes hand in hand with painting cabinets. It’s much easier to make one phone call to us and have us do that while working on the cabinets. Backsplash keeps the grease and cooking residue off the walls, but the right pattern can completely change a kitchen. We have done everything from subway tile, travertine, and small mosaic pieces. My personal favorite is basic white subway tiles. There are thousands of possibilities for your kitchen and installing backsplash is relatively quick and easy.
Drywall: We can either hang full sheets of drywall or little patches as needed before we paint. Good drywall work is the foundation of a good painting job and this is where most projects go south. Many times it’s hard to see drywall repairs. You need to feel them. The drywall needs to be smooth, free of ridges, and no dust. Good drywall work is a skill and we are happy to offer that.
Wallpaper removal: If you’ve ever done this before, you know what a nightmare it can be. Removing the wallpaper can be only half the battle. Wallpaper removal requires not only the right tools and knowledge, but possibly the most patience out of any home improvement project. The thing about removing wallpaper is that you never know what will be underneath that first layer. It may come off easily or it may pull the drywall off. If that’s the case then you will need to cover up/skim the drywall, prime, then paint. It can be a messy, time intensive job, but we are happy to do that for you.
House Washing: This is probably the least expensive thing you can do to spruce up your place. We wash using pressure and a soft wash system. Soft wash uses a chemical mix and low pressure to clean your house without worry of damaging the siding. Sometimes pressure is needed if the grime and dirt is really extreme. We also have the attachments to wash concrete patios, driveways, and sidewalks. For generally a few hundred dollars we can have your place looking brand new.
Furniture Touch Ups: This is a new service we are adding soon. Have you ever had your furniture dinged or something dented? Coming soon, we will be able to fix that for you. We’ve heard noise about the demand and are here to help!
Replacing Cabinet Hardware: Many times when customers paint their cabinets, they want to change out the hardware. This generally means going from knobs to pulls as knobs are generally outdated. We can fill old holes and drill new ones. We also carry lines of hardware that you can put on your cabinets. One thing we are adding is installing new hinges and cabinet slides. Stay tuned for that announcement when we officially add that!
5 Paint Hacks you need to know
I’ve gathered some knowledge over the last eight and a half years of painting. Most of the things I’ve learned are from mistakes I’ve made or things I’ve tried/learned that made the job easier.
I’ve gathered some knowledge over the last eight and a half years of painting. Most of the things I’ve learned are from mistakes I’ve made or things I’ve tried/learned that made the job easier. This blog is all about sharing those tips with you, so enjoy!
De-lint your roller: Have you ever gotten those annoying little hairs in your paint? They look like beard or nose hairs and you never seem to notice them until the paint is dry. Then you think you can sand them out, but surprise….that’s not happening. The easiest way to avoid this is to de-lint your roller. My favorite way to do this is to anchor some tape under the toe of my shoe and pull about a three to four foot piece. Run your roller up and down the tape (like you would be painting a wall) and watch all the fuzz that comes off. To get the strays, run some water over the roller cover and they will wash away.
Tape and paper over doorknobs: Have you ever noticed the little specks of paint or even a drip on your door knobs? When you use a roller, it can send paint raining down like snow on a January morning in Aspen. The next thing you know, you find yourself with a wet rag trying to get all the sprinkles off. Next time you paint, take a piece of 9” brown paper and tape it over the door knob or handle. Then you can paint as fast as you like without worry about messing up the door knobs.
Strain the paint: You can buy a strainer for a couple of dollars at your paint store. Paint tends to sit in a warehouse, sometimes for several months. The temperature changes will cause the paint to gum up and create little boogers of coagulated paint. If you simply pour the paint and start painting, you will smear those boogers all over the wall. The strainer liquifies these boogers and gives you a smooth finish. You’ll be far less frustrated with the entire painting process if you strain the paint.
Use a ½” roller cover: Before I started painting, I used a ⅜” cover. That’s what I used because that’s all I knew. A ½” cover holds more paint so you have to dip less. Also, by dipping less you will likely find better coverage for your paint. There are options for 9”, 14”, and 18”. We use 18”, but they can get pretty heavy. The easiest for a DIY person would be a 9”. I think you’ll be pleasantly surprised at how much paint it will hold.
Use a 2.5” or 3” brush: We recommend these for the same reason, they hold way more paint. You will achieve a straighter line and less “grab marks” with less dips. It may be a little awkward at first, but once you get rocking, it will be totally worth it.
These are five simple paint hacks you can use around your house. They will save you time, money, and make the process much more enjoyable. Happy Painting!
diy or professional cabinet painting?
Painting is a black and white thing. People either love it or hate it. There is rarely any gray area or middle ground. So, when it comes to DIY or hire, you need to really look at the time, expense, and possible headache of each one. I recently hand painted a set of doors for some people so I’m fresh off of knowing what it takes to do that. I’ll break down the procedures of each and then you can decide for yourself which route is best. Let’s start with DIY.
If you do a project you’ll need to gather all the materials. You’ll need: Sanding sponges (medium grit), rags, tape/paper (for splatters), brushes, mini-rollers/frames, caulk, wood filler, putty knife, and paint bucket/liner. All of these things can be found at your local paint store. We shop PPG for most of our gear and they are pretty easy stores to find. For paint you have a few options, but the best we have used is C2 Cabinet and Trim and for primer BIN Shellac. For brushes, 2” flat will do the trick and a 4.5” mini roller (foam or mohair) will get these looking good.
Start by removing the doors and drawer fronts. You will want to label them. If you don’t, you’ll forget where they went thus creating quite the nightmare for yourself when it’s time to reinstall. Put a piece of tape with a number (starting at one) on the door and a corresponding piece of tape inside the frame. Keep all your hardware inside the frame it came out of. If those get mixed up, it can create a headache as well. Take your doors and drawer fronts out of the kitchen and to the place you’ll be painting. I’m assuming this will be a garage or basement type area. Grab your sanding sponge and scuff up the frames. As long as they are dulled down and cleaned (soap and water or krud kutter) that’s all you’ll need. Caulk the spaces on the frame you would like smooth and then fill/sand the nail holes. Once everything is sanded and wiped off, grab your primer. Warning, if you’ve never used Shellac, it’s a pretty potent product. It’s alcohol based, so it smells like you’re in a bar. I’d recommend good ventilation such as an open window and fan. If you’re in an enclosed space you might feel sick. Shellac primer lays down very well. This means it doesn’t have brush marks or roller stipple. It is extremely watery so if you go too fast rolling and brushing you’ll have a ton of splatters. Once you’re finished, give it a light sand and then you’re on to the top coat. C2 is an amazing paint. One thing to know is that it dries quick, so you have to be quick with the brush. The best way to use this paint is to brush it on and leave it. Don’t work it back and forth. It will tack up and look nasty. Brush any areas you can’t roll first and then roll up as close as you can to those areas. Two coats should be good though sometimes a third is needed. When I painted frames by hand it usually took me 12-15 hours to finish a set of frames so if it takes you some time don’t be surprised.
Now move on to the doors. You’re going to do the same procedure with the doors as the frames. Sand, clean, and wipe down each door. Once they are clean you can start the same painting process but it will be a little more involved. Paint the backs first and NOT the sides. If you have any “rollover” from the sides it would be best on the back of the door and not the front. Once you’ve coated your doors, take some push pins and push them into the corners where the panel meets the frame of the door. This will allow you to flip the door and keep the painted surface elevated. This will protect the paint and give you room to roll the edges. You should budget about 45-50 minutes per door for sanding and coating both sides. Now all you need to do is reinstall everything and you’re back in business. All in all, this could take about a week or more to complete. You can definitely speed up the process as well if you have a sprayer. I got started with a handheld Wagner so you don’t have to spend thousands of dollars to make it look good.
Let’s chat about having them done professionally. The biggest difference you’ll notice is the factory, sprayed finish. RollTheLex sprays both the frames and the doors for a beautiful finish that’s better than the ones you can find at Home Depot or Lowe’s. We ask customers to remove everything from the cabinets and the kitchen. We will come in, remove the doors, mask off all openings and surface areas, and follow the same procedure outlined above. It will probably go quicker because of the tools we use. Spraying the frames only takes a few hours so you’re only locked out of your kitchen for about two days. We spray the doors/drawers offsite and then reinstall in about half a day. The average cost for a kitchen cabinet set is $3,500 - $4,000 which includes the paint and it takes us about a week.
So, there you have the difference in DIY vs. Professional Spray cabinets. If you need to save the money or want to try your hand at it, then DIY might be the way to go. If you’re just dying to have that amazing finish and don’t have the time, then hire that project out. I hope this helps and happy painting!
Wall and trim prep:basics you need to know
You’ve decided you want to paint a bedroom in your house. The ceiling looks decent, but the walls and trim….. not so much. Then you look at those two areas and something doesn’t look right. There are some dings and nail holes in the wall. Yeah, people say the paint will fill them in but you know better than that. Then you look at the trim and notice several gaps and holes in the trim. You know that will look janky if you just paint it. You’ve resolved to do this project the right way but are unsure where to start. This blog will help you get where you need to go!
First, let’s get all the items you need. You’ll need wall patch and a putty knife. We use 20 minute mud or MH Ready Patch. I would recommend the MH Ready Patch. It dries quickly and will sand well (as long as it’s not put on too thick). Get yourself a 1” and 2” plastic putty knife. These will bend/flex easily and are very cost effective. You can also use this on the nail holes in your trim. Now grab a caulk gun and caulk. We like Alex 20 minute or Top Gun 200. Make sure it’s a paintable caulk. If you grab silicone, it can’t be painted and will create more problems than you bargained for. For the caulk gun, get one that’s dripless. This will keep the caulk from spilling out of the tube after you’ve run your bead. On the way out of the store grab some sanding blocks. A medium grit will be just fine. Pro tip: You don’t need the angled ones. They are twice the cost and don’t help as much as you would think. You’re all checked out of the store and ready to head home. Let’s get to prepping!
Start on the walls. Use your putty knife and get some patch on it. When it comes to patching, less is always more. You only need a thin layer to cover a defect that’s shallow. If it’s bigger, then use two or three light layers. One thick layer will take a long time to dry and create some frustration for you. Once the patch dries, take your sanding sponge and sand the edges of the patch smooth. This will look like “wax on/wax off” from Karate Kid. Once the edges are smooth, lightly run the sponge over the middle of the patch. Once it seems sanded, rub your hand over the patch. If it feels smooth, then you’re done. If you can feel a ridge or indention it will need a little more work. You will see what you can feel which is why you run your hand over all repairs. Now that you’ve got the walls smooth, let’s get into the trim.
For any nail holes in the trim just follow the same procedure as the walls. Grab a wet rag because we are going to start caulking. Cut your caulk tube at an angle and use the attached rod to punch an open hole. Squeeze the trigger and run a thin line of caulk into the space you are fixing. If you put too much you will have huge globs everywhere. If you put too much, then just refill that line. Remember, less is always more. Once you run your line, wet your finger and run it right down the gap you are fixing. This will push the caulk into the gap. It will also squeeze extra caulk onto the trim and wall. Take your wet rag and wipe away that excess caulk. The same principle applies here as drywall. If you can feel it you can see it. LIghtly wipe away those ridges and let the caulk dry. Once it’s dry, run your sanding sponge over the trim. This will knock off the edges, smooth out the wood, and give you the base for a nice finish.
Congratulations! You got all the basic prep done to make your painting project look amazing! Now clean up the prep, pour your paint, and get to painting!
What Paint sheen do i pick (Part 2)
Now we are getting into the shiny side of things. We left off with “eggshell” sheen which is the most common for wall paint. We will move up a step to a somewhat uncommon sheen.
Satin: Satin is almost the forgotten sheen. It’s a little shinier than eggshell, but not as shiny as semi-gloss. It kind of falls into a “no man’s land” of sheens. Some paint brands even label their paint as “eggshell/satin.” Satin is best used on walls and customers will generally use it in a bathroom or a kitchen since it looks more durable because of the shine. This isn’t necessary as many eggshells are perfectly cleanable and not as shiny. I actually used a satin one time on some trim and it came out looking like a flat. It was dull and almost chalky. That could be a good use for a unique project, but I wouldn’t have that as my go to.
Pros - Wipeable and durable
Cons - Difficult to touch up, will likely be too shiny on projects.
Recommended uses: Walls or unique trim projects.
Brands we use: PPG Speedhide Zero.
Semi-Gloss: Now we are into the shiny stuff. Semi-gloss is the standard sheen for trim, doors, window casings, crown moulding. It has more shine which allows these trim pieces to stand out. A good semi-gloss paint will level out well and should be easy to work with as long as you don’t overbrush. Trim can be painted with either latex or oil (in semi-gloss). I would recommend latex for most DIYers since it’s easy to clean up and work with. Now the more shine you have, the more defects/inconsistencies will be visible. Before you paint these areas I would recommend filling holes/defects, sanding them smooth, wiping and cleaning the surface before paint. If you have inconsistent repairs then they will likely show through the paint and you won’t be happy with the project.
Pros - Nice finish, perfect for accent pieces (trim, doors, casings, etc.)
Cons - Would not look good on walls, prep needs to be done very well to look proper.
Recommended uses: Trim, doors, window casings, crown moulding.
Brands we use: C2 Luxe
Gloss: This would be the shiniest of all the paints, which we rarely use. Gloss paint would be very shiny and used on trim pieces to make a bold statement. This would generally look good in an older house with a lot of character or a new, custom build. The prep on these surfaces would need to be nearly perfect to not have the defects show through.
Pros - Looks amazing in the right context
Cons - Prep work needs to be almost perfect, sheen can be difficult to find, could look gaudy in the wrong places.
Recommended uses: Trim, doors, window casings, crown moulding. Also special projects such as bannisters and furniture.
Brands we use: C2 or Fine Paints of Europe (if we did much gloss).
Well, there you have it! The six main paint sheens, broken down, and discussed so you can pick the right one for your project. Happy DIY painting!
What paint sheen do i pick?(part 1)
This is one of the main questions you will need to answer as you move forward with your paint project. First let’s break “sheen” down in laymens terms. The “sheen” of the paint is really just the “shine” of the paint. For simplicity sake, this article will focus on the normal areas that get painted with certain sheens. Buckle up because here we go!
Flat: This is the paint with the least amount of sheen and it will feel pretty chalky to the touch. Flat paint is generally used on ceilings and the walls of many new construction homes. It goes on ceilings because shiny ceilings look somewhat out of place. New constructions use a flat because it’s generally inexpensive and it hides defects (nail pops, drywall bows, etc.).
Pros - Looks great, hides defects, is cost effective, easy to touch up.
Cons - Maintenance is virtually impossible. Smudges, dirt, etc. can’t be wiped off without leaving a mark on the wall.
Recommended Uses: Ceilings and walls that won’t have much contact.
Brand we use: PPG 9585 for ceilings/PPG Speedhide Zero flat for walls.
Matte: This is a step above flat. Matte still has a low sheen finish but has more body/solid content to it. Matte can be used on ceilings but will generally be more expensive than flat. If you want a low luster finish AND need something you can wipe off, then this paint is probably the ticket for you. A good matte paint will not be very cheap, so if you’re on a budget this might not be the best way to go. Generally they will run $50 - $70, so if you need low cost to freshen up a room you might need to look at something different.
Pros - Looks great, good coverage, very wipeable, easy to touch up.
Cons - Expensive
Recommended Uses: Walls in either residential or commercial settings.
Brand we use: PPG UltraLast. Benjamin Moore Regal Select or Aura are also great.
Eggshell: This is the sheen you will find on the majority of walls. Eggshell is right in the middle of the spectrum of sheens. It has enough shine to look nice, it will still hide defects, and you can clean it easily. Customers will also have a wide choice of products to choose from across any price point. If you’re doing a neutral color over a neutral, I would recommend using a mid-grade eggshell. It will cover nicely and still be able to be cleaned. If you need a big color change I would upgrade the product. As we get into the shinier products, they will be harder to touch up because of the added sheen. Also, the darker the color the shinier the product will be. Deep colors have more solids and will naturally shine more. If you want something bold, a matte may be a better choice.
Pros - Looks great, good coverage, cleanable.
Cons - More difficult to touch up (especially deep colors), dark colors may look shinier than expected.
Well, that’s it for part one! We’ve gotten an overview of the first half of sheen that mainly go on ceilings and walls. Part two will cover satin to gloss.
Some DIY PAINTING TIPS
Painting is a very black and white project. People either love it or hate it. There is no real gray area. I have never heard anyone say, “Painting is ok. I don’t mind it.” It’s an all or nothing thing. That being said, I know there are people reading this that love the idea of grabbing a brush/roller and going to town on a room. That being said, I wanted to share with you some of the tools we use in hopes of making the job a little easier on you.
Scotch Tape and 9” Brown Paper: If you are not painting the baseboards, these two items will be a life saver for you and here’s why. Every painter drips and splatters paint. If someone tells you they don’t, they are lying to you. We have a combined 50+ years of experience and we still drip paint off the end of a brush or roller. Tape and paper over your baseboards keeps your mind focused on your painting work because you’re not worried about drips and splatters.
3” Brushes: Most of my DIY friends are going to grab a 2” brush. Why? It looks much less intimidating than the big, bad 3”. The problem is that a 2” brush really doesn’t hold much paint. You will find yourself re-dipping that brush every three feet. This will, in fact, affect the line you’re attempting to cut. Every time you break off your line, you have to meet it again the next time you dip. The less you dip, the longer your line and the better chance you have of keeping that thing straight. And that’s what we are all here for!
14” or 18” Rollers: This is along the same lines as the 3” brushes. It’s more paint on and quicker. The less times you have to dip a roller, the less chance you have of mistakes being made. Also, you will get done much quicker.
Sand between coats: I would recommend a pole sander over a sanding sponge. Sanding before each coat knocks all the little nubs off the wall and opens up the wall for the paint to grab a bit better. Sanding lays the groundwork for the paint and will overall lead to a better finished product.
De-lint your roller and strain the paint: This piggybacks off the previous tip of sanding. To de-lint a roller all you need to do is wrap it in painter’s tape and then pull the tape back off. This will get most of the stray hairs off the roller that would otherwise end up on your freshly painted wall. Sanding between coats will also take care of the strays that avoid the tape. Finally, use a strainer to strain your paint into the bucket. Most paint cans sit in a warehouse that is not temperature controlled for months at a time. The hot/cold can cause paint to coagulate and creates little “boogers” (as we call them) in the cans. Straining the paint squishes them and leaves you with a smooth product to put on the wall. Trust me, you don’t want to be picking these little guys off the wall after you’ve rolled a coat.
There you have it! Five tips for you to get your walls looking great in a more efficient way. Happy DIY-ing!
Proper prep prevents poor performance
I know you’ve heard that phrase before. It’s applicable to almost anything. It’s especially important in the painting world. Many times customers ask, “If I paint this defect it will make it look better, right?” My answer is always, without hesitation, “No ma’am. It will actually make it look worse.” A good percentage of our repaints have been- believe it or not- painting over the dreaded flat paint on walls. A flat on the walls will hide defects because it doesn’t reflect light and doesn’t have a sheen (or shine). 99% of our customers paint walls in an eggshell. It will reflect more and, in turn, show more. So, to make a great experience for our customers we do the following to make your walls look smooth and new.
The first thing we do is put down tape, paper, and drop cloths. We don’t use tape to cut a straight line. We do, however, use it to protect from drips and splatters. If we are painting the baseboards, we tape and paper the floor. If we are NOT painting the baseboards, we put tape/paper over them. This allows us to concentrate on the actual painting (and not worry about a mess). Once the area we are painting is protected, we start on the walls.
There are likely more defects in your walls than you think. Sure, you have the picture holes that will need to be filled. What you likely haven’t seen is pesky little dents in the wall, slight tape seams (that have come loose due to settling), and other knicks/cracks. We take drywall mud and go through the entire area before painting. We get the drywall to what is called a level 4 finish. That is a smooth, defect free finish that you should expect when buying a new home (and we deliver that to you whenever we provide painting services).
We sand before each coat of paint. We use triangle sanders that look like oversized pieces of pizza. This helps us cover a lot of ground and get into every nook/crack of the wall. Sanding does two things: 1. It helps the paint adhere better than if no sanding is done. It opens up the previous surface and just gives it a little more bite. 2. The paint will only look as good as the surface it’s put on (so we want that surface smooth before every coat).
Before we load up our 18” rollers and 3” brushes with paint we de-lint the rollers and strain the paint. Think of roller covers like owning a golden retriever. They shed (and can shed) a lot. Wrapping them in tape or rolling them over tape pulls the excess fibers off the roller and- in turn- keeps them from coming off while painting. Lastly we strain the paint. Buckets of paint sit in warehouses and storehouses for weeks or months before they get shipped to a dealer. During that time the paint will accumulate globs or boogers in it that will stick to the wall. Running the paint through a strainer and into our buckets squeezes out all these globs and ensures you get the best finish.
There you have it! That’s what we do at RollTheLex to make sure you get the best experience and best finish on your walls. Is it more work than “just painting?” Sure. But you’re more than “just a customer” to us.
Company Culture at Roll The Lex.
Before I worked with RollTheLex, I was familiar with the company because I had hired them to paint projects at my house - twice. They showed up on time, left my house cleaner then they found it, and did an impeccable job at the painting too. If I hadn’t been impressed the first time, I wouldn’t have asked them to come back.
When I reached out to David in January 2020 about the possibility of a “partnership” between my small business and RollTheLex, it was because I was familiar with the company and I wanted to see if I could help someone in a trade like business with my administrative skills. He told me later that he was immediately concerned. In this business, a partnership usually means a sellout, a takeover, or at the very least a sub contractor agreement. He still took the meeting, and while he didn’t hire me at the time as a contractor, we stayed in touch through social media and when he was looking for an office administrator in the summer of 2020, I happened to have availability.
Even though I was working another part time job at the time, and still running my small business, it was an easy yes. The integrity and transparency I had come to expect from David’s personal social media, is the exact same character with which he runs his business.
I have now been working with RollTheLex for well over a year, and in that time, I have since quit my other part time job and stopped trying to gain clientele for my small business. While I am still officially a part time employee, I enjoy very flexible hours that are mostly on my own terms. This turns out to be a very family friendly environment, that allows me to work at times of the day that to others might seem odd, but it ensures more time with my young kids. David treats all of his employees, whether they are crew, office or contract staff, with the same respect and professionalism, and gives us all the same ability to put our families first.
When RollTheLex posts a job opening, the culture is shared about most. Having experience with some toxic office cultures in the past, I can say with complete honesty that working at RollTheLex has quite a unique and positive culture.
I’ve never actually worked in a trade or field based business before, and I’ve had to get used to quite a few differences from the office environment. During my learning curve, the entire RollTheLex team has always been helpful and never judgmental. When new field staff are hired, there is always an abundance of time and patience offered to employees in order to learn skills on the job, as well as, how our company handles work.
From my understanding, not every owner or boss is as forgiving. I’ve watched David help out new employees out of his own pocket, support his long time employees with additional hours and bonus opportunities, and financially donate to help the local community.
David’s leadership makes RollTheLex a great place to work, but the values with which he leads the company are held by the field crews as well.
Good customer service, ensuring that all customers are treated fairly, and making sure that the job is done right are things that I hear from the crews all the time. I work to make sure the schedule is up to date with all jobs, and job changes, and they check in with details about how the job is going. Without the RollTheLex culture, this communication would not be as fluid as it is. While I’ve been at RollTheLex, I have helped streamline and implement processes that have changed the company forever. David was open to new ways of doing things if it meant that he had more freedom and his company could grow.
We are now able to collect customer information for quotes in a much more efficient manner. Without that attitude of forward thinking and looking at future growth, this business would be stagnant. However, as it is, David has continually grown RollTheLex to hire more people, take on more customers and along with that, has created an atmosphere of growth for everyone alongside him. Now, with our new General Manager, we are set to continue growth in this culture, establishing a painting business in the central Kentucky area that is not only good to its customers, but is also good to its employees.
Painting walls In Lexington - The roll the Lex Way
Painting walls is probably the one thing you, as a homeowner, can do fairly easily to freshen up your home. Maybe you just moved into a new place and you hate the color that is on the walls. You could be living in the same house for the last 10 years and need a change. There are 5 kids and a dog running around the house and it’s just….done. Painting trim is tedious, ceilings will wreck your arms/shoulders/neck, so walls are the obvious choice to change things up. Let me share the products and process we use to hopefully save you a few headaches along the way.
How to choose a paint:
First let’s talk about product. We use 3 different lines of wall paint. PPG Speedhide Zero, Ben Moore Ultra Spec, and Ben Moore Regal Select. All three are very good paints. Speedhide and Ultra Spec are in the $25 a gallon range while Regal Select is pushing $50. You need to answer two questions before purchasing the paint. 1. What color(s) are you doing? 2. How much durability do you want? Speedhide/Ultra Spec cover well using neutral colors (greys/tans) and hold up well to wiping down with a sponge. Regal Select has more solids (part of the paint that stays on the wall after evaporation) so we use it for lights, pastels, and deep colors. It also can hold up to tougher scrubbing. If your kids like to fling spaghetti all over the place, that might be the ticket for you.
The best tools for painting
Now that you’ve chosen your paint, you need to apply it to the wall. Here at RollTheLex we use Wooster 3” flat brushes and Wooster 18”x1/2” ProDooz roller covers. The reason we use these is they hold more paint per “dip.” The more paint you get in the brush/roller, the more efficient you’re going to be. If you’re new to painting we would recommend a 2 or 2.5” angled brush. Most people are comfortable holding those and feel more confident painting straight lines. For roller covers, you’re going to find 9” (length) and ⅜” or ½” width. The second number is how long the hairs are. So, the larger the fraction, the more paint you can hold in the roller. For rookies we would recommend a 9”x1/2”. It won’t overwhelm you with weight and you’ll hold enough paint that you won’t be re-dipping constantly.
Preparation is key
The paint is purchased, you’ve got your brush/roller ready to go, so now it’s time to get some paint going. First take off all the light switch covers and outlet plates. There’s no need to paint around them and it will take three times as long. After you do this, then run a sanding pad over the walls. We use large triangle shaped sanders, but a quick zip with a sanding pad will do just fine. You’re not trying to get splinters out of wood here. You just want to open up the wall and knock off any nubs. Many customers use tape to protect ceilings/trim from getting paint on them with the brush. We don’t do that. With our experience and the need to be efficient, we only run tape along the baseboards to keep the paint splatters down. If you want to use tape, then do whatever makes you the most comfortable.
It’s finally time to put the roller on the wall.
Now it’s painting time! When I first started painting my wife would often call me and ask how it was going. I would respond “If I could ever get to the painting part it would be great!” That’s where you’re at! I like to work “up to down/left to right”. This means I’ll start in the top left corner and cut my line at the ceiling, then work my way down and finish at the baseboards. After cutting in a wall, it’s best to immediately roll the wall. This keeps a “wet edge” which is not letting your brush work get dry before you roll it. If you’re a rookie painter, then I’d suggest going one wall at a time until you get faster.
Most walls take two coats of paint, so after you do that it’s cleanup time! We throw away all our brushes and rollers, shake out the drop cloths, and finally put the switch covers back on. If you read this and are a DIY person, then I hope it helps! If you read it and still refuse to DIY, then definitely give us a call. Thanks!

Painting Kitchen Cabinets The Right Way
We specialize in our cabinet refinishing service. Find out how we get a "better than factory" finish every time. Proudly serving the greater Lexington, KY Area.
Here at RollTheLex Painting, we paint anything. My go-to joke with customers is, "We'll paint the dog pink if your check clears."
It's funny and breaks the ice really well. While we paint "all the things," our specialty is painting kitchen cabinets.
When we first started refinishing cabinets six years ago, we sprayed the doors while brushing the frames. We have since transitioned to spraying the frames in place. It took a while to get our rhythm down, so let me share our process with you.
STEP 1: REMOVING THE DOORS AND PREPPING THE KITCHEN
You can think of this step like preparing a gourmet meal for your kids. You spend hours and hours preparing it, to have dinner devoured ferocsiously in seven minutes. Prepping is tedious, time-consuming, and most of the guys will say it's their least favorite part of the whole process.
I can't lie, I'm not the biggest fan of "prep time" either, but it's necessary to achieve the quality of finish we're known for.
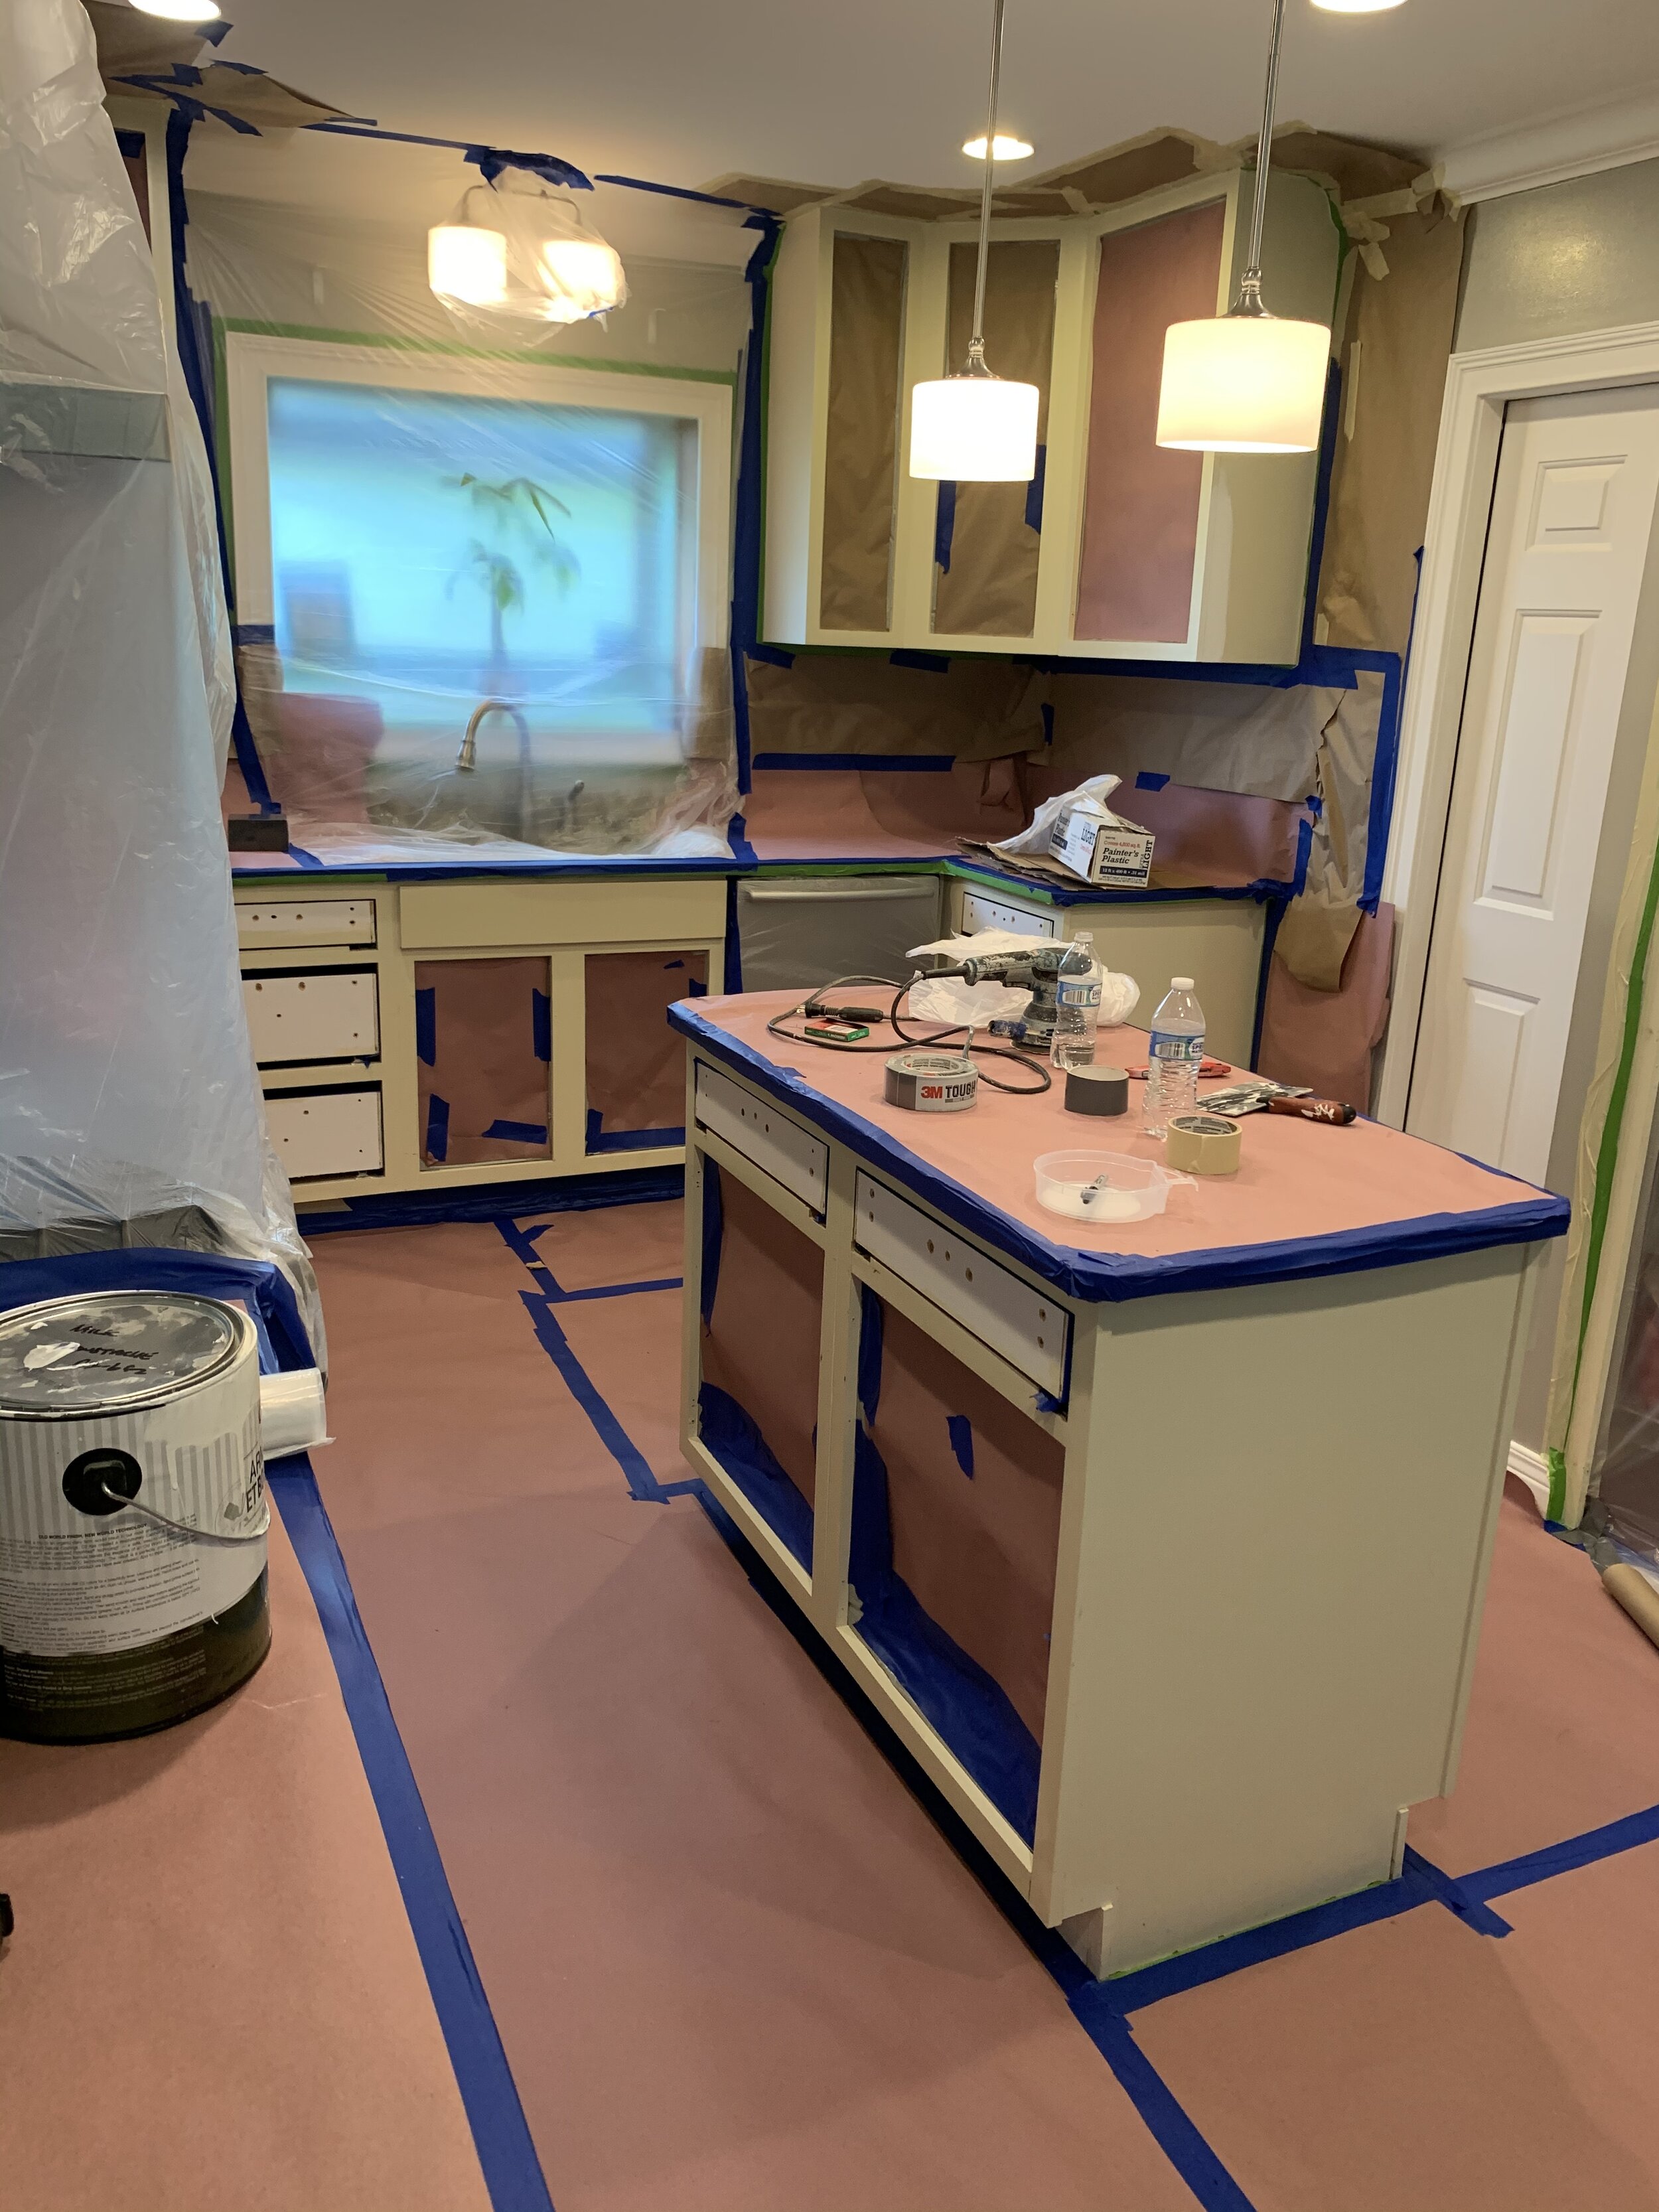
We mask off the backsplash, cover the countertops/floors, and mask off all the openings in the frames. We use different strengths of tape from 3M and FrogTape and plastic to cover the cabinet openings. We used paper for masking in the past, but it doesn't have much "give," so plastic ended up working better for us.We need the "give" in the plastic because of the air push of the sprayer.
We paint cabinets using airless spraying systems from Graco and Titan (390PC and 440i to be exact), so by "airless," it simply means the paint is pushed by a piston and not an air compressor. We can adjust the amount of pressure, but it will still create a wind force that can blow the paper off the openings. Plastic flaps in the wind like a flag, so this keeps the tape from pulling off the cabinets.
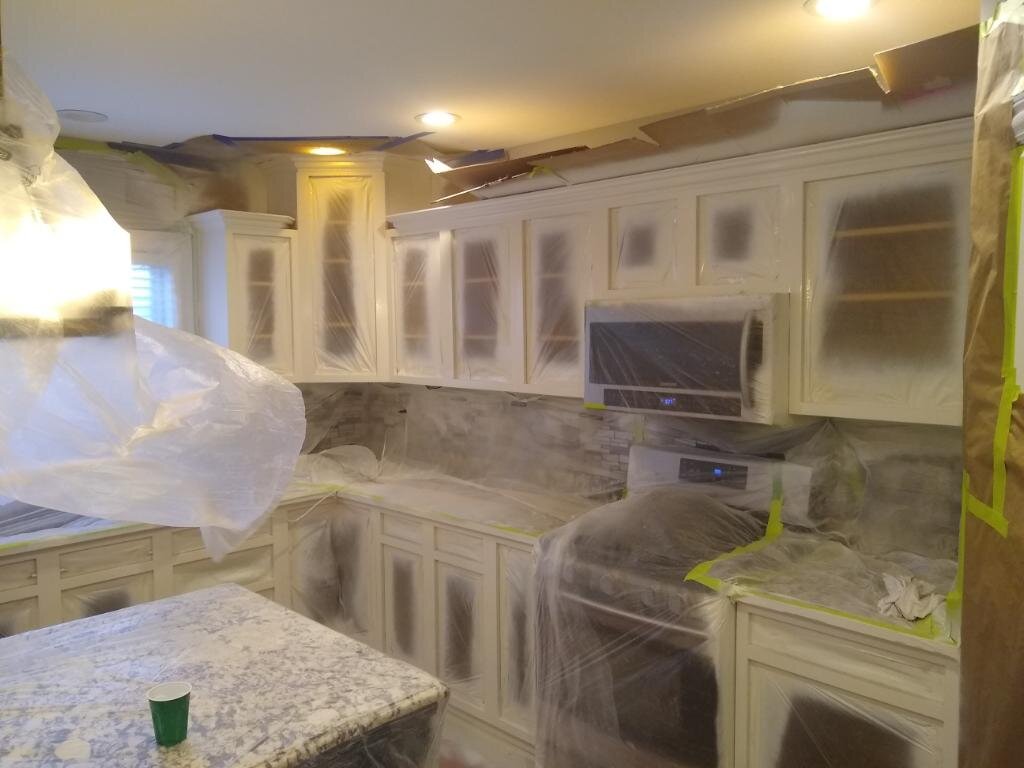
Step 2: Building the spray booth:
We build our portable spray booth using ZipPoles, which are spring-loaded and securely hold plastic in place. This lets us turn the kitchen into an airtight spray booth with this killer product. We use a fan with an air duct that's run outside while spraying, so you end up with virtually zero smell in the home.
After the booth is in place, we sand the frames with orbital sanders and then get ready to spray. Spraying typically happens around the end of the first or second day of the project. We can split between two crews, painting the doors in the shop and the frames at the job site. We find this is much more efficient since it gets pretty tight in a kitchen with more than one person painting.
THE “NITTY GRITTY” on PREP:
Our team cleans each of your doors with a degreaser, sands them with orbital sanders, and then each door is suspended on a hanger in our shop. We sand the flat surfaces with 180 to 220 grit sandpaper and then use flexible sponges to get any crevices.
(If you're not familiar with sandpaper grit, the lower the number, the rougher it will be. For example, we will start with 180 to remove the old finish and work up to a 220/300 to give it a nicer finish.)
We drill holes in the tops/bottoms of the doors to hang them in our booth to spray, but these holes never show in the finished product, and it's a significant space saver in our drying booth.
Step 3: Painting Your Cabinets
Once all the prep is completed, we spray a shellac-based primer followed by a topcoat with a urethane enamel. You may not be familiar with these terms, but the critical thing to know is that these dry super fast and hard. We use shellac because of its quick dry time, excellent bonding characteristics, and remarkable ability to cover stains.
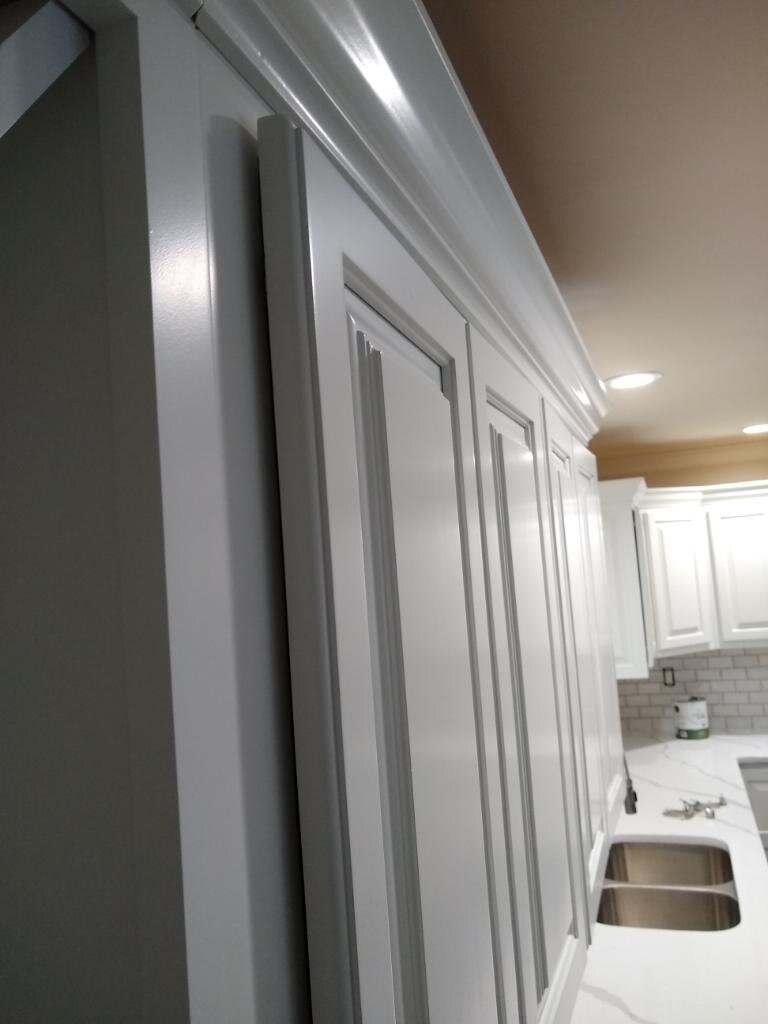
Our topcoat paint is C2 Cabinet & Trim. It has a quick dry time, cures hard enough to be approved for floors, and we think provides a better than factory finish.
STEP 4: Reinstalling your refinished kitchen cabinets.

Day four is usually our reinstall day. We wrap the doors/drawer fronts in moving blankets from Harbor Freight. Don't laugh. They are inexpensive and soft, which keeps them from leaving prints on the newly finished doors. Reinstall takes approximately half a day. After hanging the doors and putting the hardware back on, we re-adjust everything to level it, and the project is completed.
This entire process takes us about 3-4 days, and the average cost in 2020 was $3300. New cabinets start at around $6000 and go up from there, so we are very excited to offer this service to customers in lieu of having their cabinets replaced.
It saves you money, time, and a lot of headache when you choose refinishing cabinets over replacing them.
We can also order new pulls or knobs if you really want to change up your look. Sometimes, the smallest changes can make the biggest difference.